|
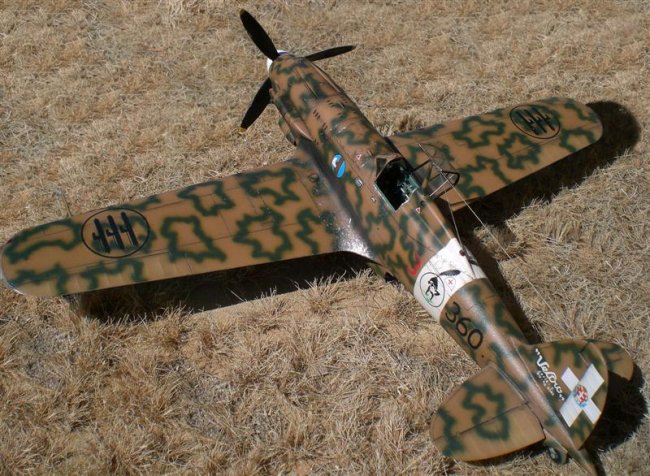
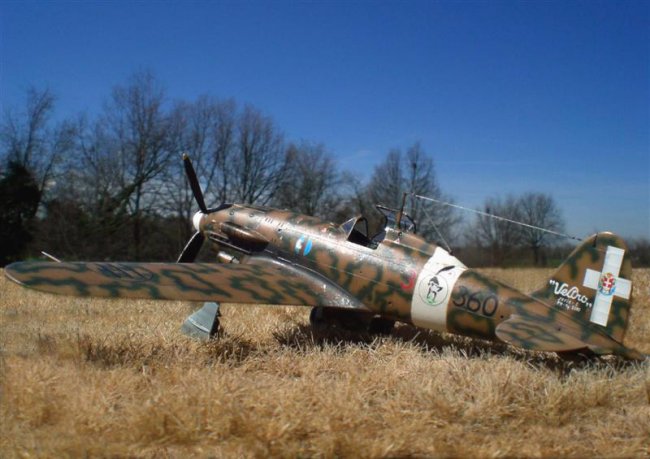
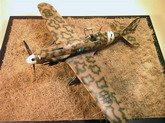
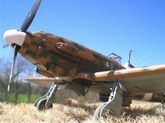
This is a model of a
Regia Aeronautica Macchi C.205 "Veltro" Serie I of 360° Squadriglia,
155° Gruppo Caccia in Chinisia (Trapani), Sicily, in July/August of 1943.
The Hasegawa kit is
a good one, very easy to assemble, correct in shape and dimensions and with nice
surface detail.
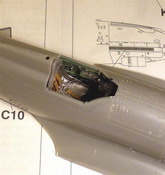
Some work, though, is necessary to improve the model.
The cockpit looks a little "sad" and the undercarriage legs have ugly
ejector pin marks that must be filled and sanded.
The only part of this kit I really didn't like are the engine exhaust stacks
which are undersized and so shallow that they are impossible to drill out.
Better to replace them with resin parts or with leftovers from a late Bf 109 if
you have them in the spares box (the Fiat RA 1050 "Tifone" engine was
basically a license built DB605 A1).
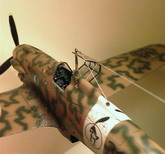
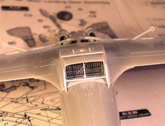
Small parts like the pilot's seat, oil and coolant radiators, supercharger
intake and landing gear covers will look a lot better if refined and detailed a
little.
Also, it's important to study the reference photos of the a/c you intend to
build, because the Hasegawa moulds for C.202 "Folgore" and C.205
"Veltro" sport a wide array of access panels, openings, hatches and
gills that are often wrong in shape or layout (or both) in relation to the
version of the a/c you are going to represent and they need to be erased or
filled in and rescribed accordingly.
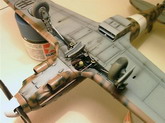
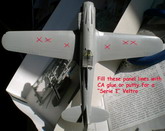
I built my "Veltro"
without any aftermarket parts.
I tried to address the above mentioned inaccuracies and added only scratchbuilt
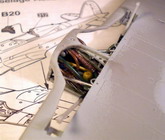
details in various areas, especially in the cockpit and wheel well.
The latter represented quite a challenge with its intricate pipework.
After having studied some reference photos and how other fellow modellers have
tackled this part, I opted for thick solder wire to recreate the two main lines
of the cooling system that are arranged around the engine bearers and the
landing gear actuators. The rest of the tubing is made from thin electric cable
insulation. The layout and number of these tubes is "fictional", so to
speak.
I kept on adding and shaping pipes until the area looked convincingly
"busy". The plumbing's color, though, matches the reference
chart of Italian aircraft that identifies the various subsystems with the
relative color:
- Green: coolant / - Brown: lubrication / - Yellow: fuel / - Black: exhaust
gases / - Blue: air / - White: oxygen / - Red: fire extinguisher.
Luckily, the thin cables had just the right colors which saved me from painting
every single line. A wash with oils and a sealing coat of flat acryls was all I
needed to get a credible enough wheel well area.
In the end, I spent some hour dealing with fiddly bits and balking cables but in
my opinion the result was well worth the hassle.
Click on
images below to see larger images
Time came to tackle
the dreaded "smoke rings" camo scheme.
I used Humbrol 118 for Nocciola Chiaro 4 (light hazel 4), Tamiya XF-13
J.A. Green for Verde Oliva Scuro 2 (dark olive green 2) and Humbrol 127
with a couple of drops of Hu. 65 for Grigio Azzurro Chiaro 1 (light blue
grey 1).
First I sprayed and then masked off the white fuselage band with Tamiya flat
white, then I preshaded the undersides with dark grey.
About the upper tan color, first I preshaded the panel lines with dark brown
then after having sprayed the base color, I retouched the center of the panels
with a mix of base color plus about 20% of white.
However, after having painted the smoke rings the effects of this process are
barely visible.
I painted the ringlets freehand with the paint thinned to about a 70/30 thinner
to paint ratio, keeping the pressure low and spraying as close to the model
surface as possible. The color was airbrushed on slowly, carefully drawing the
outline of the ringlets first and then gradually building up their thickness.
I couldn't avoid a little overspray
here and there and some rings turned out better than others but I'm pretty
satisfied with the outcome.
A couple of coats of
floor wax prepared the model for decals.
As a side note, here in Italy "Future" in not marketed so I use Emulsio
"Facile" floor wax as substitute with good results.
I used the kit decals, although they left me pretty disappointed.
They have rich colors and perfect register but they could have way better
adhesion. Despite many applications of setting solution and repeated poking and
dabbing, some of them still had the face to show some silvering. Nothing that a
few touch ups with a fine brush couldn't fix, but it annoyed me nevertheless.
Moreover, my sheet had a printing flaw in the other version's emblem (some
letters missing in the "Incocca, Tende, Scaglia" motto) that makes
this alternative almost unusable.
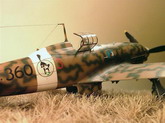
Also, remember to cut away the last two digits to the roman numeral
"III" you find in the stencil on the vertical stabilizer: 3 - 360 was
an early "Serie I" bird with the wing mounted 7,7mm machineguns.
Last but not least, if you follow to the letter the marking instructions you 'll
end up with the squadron numerals applied in the wrong order. The red
"3" is fore of the white band on both sides.
Hey, looks like Hase & Cartograf goofed this one a bit!
Another couple of
floor wax coats sealed those balking decals for good (although some silvering is
still noticeable...).
A pin point wash with dark grey / raw umber oils followed to profile the panel
lines.
At this stage, I added some wear and tear to the model by spraying the exhaust
stains and adding some "dirt" to the undersides aft of the engine and
around weapons' muzzles and ejection chutes.
My usual method consists of a very thinned mix of black / grey / brown oils and
turpenoid and a couple of drops of Humbrol Matt Cote. The Matt Cote acts as
"gripping agent", preventing the highly diluted mixture to form tiny
rivulets and flow away unrealistically. It also gives the stains that
"chalky" texture you often see in pictures of real aircrafts.
I added some paint chipping with Humbrol Aluminium in the usual spots (on wing
roots, engine cowling fasteners and guns access panels), but without going
overboard with it because wartime photos show a rather well mantained aircraft.
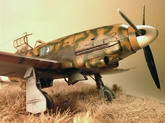
After having
installed the landing gear, canopy, prop & spinner and pitot tube, a last
protective coat of Humbrol Satin Cote wrapped up my work.
I take the chance to thank Mr.
Steve Bamford for all of his work and I hope you guys enjoyed this build as I
did.
All the best,
Lorenzo Cassinadri
Click on
images below to see larger images
|
|