|
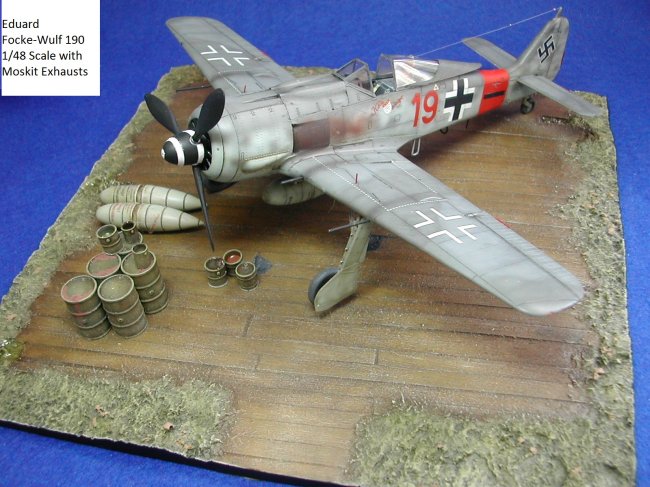
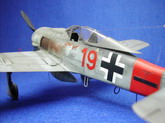
Red 19 was
the regular aircraft of Unteroffizier Ernst Schroeder.
Configured as an A-8, it was
fitted with the nose machine guns but not the extra armour of the Sturm-Jagers .
This made it a lot more lively in the handling department than many of the
aircraft in the Jagdgeschwader 300 Gruppe .
This Red 19 FW190 machine was
'lost' on 27 November 1944 when Schröeder was forced to belly land after a
dogfight at low altitude with a P-51. The aircraft was eventually repaired and
returned to service with JG 301. The machine was probably scrapped post-war
"
Red 19 had been in my mind to do
a model of this aircraft for quite some time.
This was due to the fact when I
was a teenager I loved the centrefold illustration used in Illustrated
Encyclopaedia of Aircraft Volume 3 Issue Number 27 where there is a picture
of the left side and upper plan view of this aircraft which clearly has both
Kolle Alaaf markings on both sides of the fuselage - This is the markings and
camouflage pattern that I went for my model
( see scan of the actual
page I used as a reference...last photo at bottom of this webpage )
This shows a rather unique style
of mottling that I thought might make an interesting challenge. Rather than the
usual "spot" style of mottling, this is more like "strings".
This picture also shows the early JG300 RVD band (in rust/primer red) and II
Gruppe bar, with bilateral ‘ Kolle Alaaf ‘ inscriptions and Cologne city
coat of arms shield.
It seems that Red 19 started off
with a fairly standard mid war paint scheme, the previous tactical number had
been painted out (possibly with RLM 75) and the "19" applied. This
scheme also carried the II Gruppe bar but no RVD band. Sometime in November
1944, the aircraft was partially repainted and the "string" mottling
was applied. The RVD band was also applied at this time as was the bilateral
inscription "Kolle Alaaf ! "
The inscription "Kolle Alaaf!"
has been identified in several sources, including Bernd Barbas' book, as
carnival shout and it is a carnival cry meaning "Cologne is Alive!" in
a local dialect. This seems to make sense. It also seems an appropriate
inscription for a young fighter pilot defending the skies over his home.
This aircraft was lost while
trying to evade several Mustangs during a bomber raid. Ernest Schroeder luckily
survived the war.
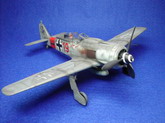
I used the Eduard 1/48 8175
version of the Focke-Wulf 190 A8/R2 but used the fuselage parts which didn’t
have the added cockpit armour and used the canopy with no added side armour
glass.
The other aftermarket additions I
used were the out-of-production Moskit hollow metal exhausts ( specially
designed for the Focke-Wulf 190 ) and the excellent Air Master brass
barrels by the Polish company Master Model ( order ref AM-48-019 ). These
made a huge improvement to the look of the model, and I highly recommend them
to any modeller.
Markings for this aircraft were
covered on the aftermarket Aeromaster decal sheet, 48-696 "
RammJager part 4 " which I specially purchased.
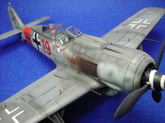
The decal instructions show the
left side of this aircraft with the earlier, simpler paint scheme and the II
Gruppe bar.
The instructions were followed
for the wing and tail, as these appear to have been similar even after the
repaint.
The squiggle mottling on the
fuselage is essential, as I wanted to get it right and look the way I wanted
it.
Before you paint it check it
against the references.
Some of the mottling is so unique
and distinctive that, in the end, I ended up cutting masks for it (around the 19
on the starboard side). The problem is that the mottling has a very soft edge
that requires that the paint be applied very thinly, almost transparently. This
means repeated applications to get the right colour density. The first shot
isn't so bad; it's trying to make the follow-on squiggles go exactly the same
place that gets tricky.
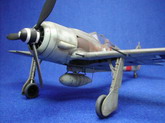
The Attention to detail in the
best seller FW190 Model by Eduard is very impressive. For example, in
every Focke-Wulf Fw 190 kit produced to date, the access hatch for the inboard
wing cannon has a big seam line running in line with the wing root. This is
usually tricky to eliminate. Eduard's kit addresses this challenge with separate
hatches. Not only does this avoid the seam line, but Eduard also provides gun
bay interior detail to permit the hatch to be posed open. The cowl gun bay is
comprehensively detailed.
|
Click on
images below to see larger images
|
|
|
This was a superbly detailed kit
which is nevertheless a bit hung up on its BMW engine and weapons. It's designed
to have everything on show via appropriate panels and an open cowling.
It no doubt looks great displayed in
this way as Eduard intended for the kit.
However with my model , I wanted to
keep the panels closed.
It was not too problematic; I just
needed to sand the interior detail off the wing root gun panels or the panels
won‘t close properly otherwise ( test fit it yourself to see what I mean ).
But the fuselage gun cowling was
different; The gun tray and bulkhead needed to be eliminated. The over-wide
fuselage then needed to be braced around the gun cover and carefully super glued
into place. Finally, the instrument bezel had to be secured to something as the
gun bulkhead was gone.
Once this little procedure had been
performed, I was able to proceed with the rest of the build.
(I had previously added the brass
nose machine guns from the inside of the gun cowling for them to just protrude
as in the real aircraft )
It was a positive experience, and I
was left with a model to be proud of and a feeling of accomplishment.
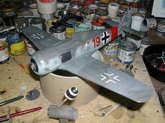
The base and accessories are from
the Verlinden resin
Luftwaffe Service Platform , and I
think they set off the model beautifully.

As a result of building this model I
have found some areas requiring special attention during assembly .
These include the following:
Check the position of the
completed cockpit interior to the fuselage halves. Especially the back
(upper) part of the cockpit tub must be aligned exactly with line on the
fuselage halves. Also the weapon bay must be carefully positioned.
Another important point is the
wing spar (part I16) installation. In this step (page 5 of the
instructions), first glue part K20 into the wing, and then add part I16.
This sequence will guarantee that the wing spar will be exactly vertical to
the wing bottom. This is crucial for wheel well assembly and the whole wing
geometry.
Another sensitive point is the
engine mount installation. In this point, find the exact position of the
part K18 on the reverse (inside of the fuselage) side of the part H12 (wheel
well). K18 fits exactly to the notch in the H12. If you glue K18 carefully
to the given position, the engine block will easily assume the correct
position when it is glued to the engine mount.
The locating holes for the main
wheels are quite large. This is because the wheel fits to the axle at an
angle. Use the instruction picture (page 10) to determine the exact angle of
the wheel to the undercarriage leg.
While we are talking about the
undercarriage, when you will assembly the K7 (u/c leg) to the H1 (u/c
cover), the location pins on the leg will give you exact position of the
hatch (H1) to the leg. This is similar to the assembly of the u/c to the
wing – glue the leg to the fine locating position in the wheel well, and
immediately add J30/J37 to the position in the wheel well and on the u/c leg
(there is a fine location pin on the leg which fits to the small hole on the
end of the tow bar). It will give you exact position of the undercarriage to
the wing. This is a different system compared to other manufacturers' kits,
but it delivers surprisingly good result.
Peter Rodeike's " Focke Wulf
Jagdflugzeug, Fw 190 A, Fw 190 Dora, Ta 152 H " and Alfred Price's
"Focke Wulf Fw 190 in Combat
" also indicate that Red 19 was a straight A-8 rather than an A-8/R2
David Walker
|
Click on
images below to see larger images
|
|
|
|