|
|||||||||||||||||||||
|
|
|
|||||||||||||||||||||
|
|
|
|
||||||||||||||||||||||||||||||||||||||||||||||
|
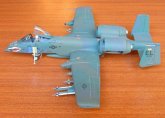
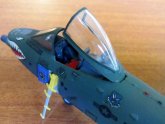
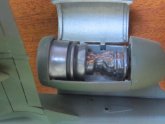
Hello, fellow modelers and readers! This time I'll show my Fairchild-Republic A-10A Thunderbolt II (also widely known as Warthog) from Monogram in 1-72 scale. It's a raised panel lines very old kit, in fact (to the best of my knowledge) the first kit of the A-10A that was released in that scale, in 1979 (according to Scalemates database.) Compared with the more recent Italeri A-10A kit, apart from the raised panel lines, the Monogram kit doesn't include a clear piece for the HUD (the HUD is a thick, horrible block molded as part of both fuselage halves,) doesn't include underwing chaff dispensers, cannot have its brakes opened, but has the option to show one of the engines opened, and has a boarding ladder and two pilot figures, one to be placed on its seat and the other to be displayed outside the aircraft, as if he were ready to fly. Another low point of the Monogram kit was its limited choice of ordnance, and that it had only one marking option, by the way an eye-catching one with shark mouth. My Thunderbolt II was one of the first models I painted with an airbrush, and was nearly finished more than 20 years ago. I painted it free-hand, following the kit's instructions. I took a little artistic license and so my Warthog has blue eyes. I didn't finish the kit at that point because I wasn't satisfied with the kit's supplied armament, many Mk. 82 bombs and some GBU-10 Paveway II laser guided bombs. Although I painted all of the Mk. 82 and Paveway bombs supplied with the kit, I always wanted to finish my model displaying different types of armament, and also an ECM pod.
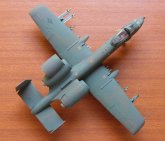
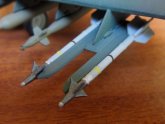
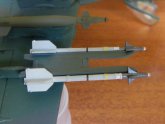
I took an ALQ-131 ECM pod and a pair of Rockeye bombs from an Italeri F-16C/D kit I bought later. I modified the Rockeye bombs a little, because the F-16 ones had a round tip at the point of the nose, but the A-10 used Rockeyes with flat tips. I also wanted my A-10A to have a couple of Sidewinder missiles mounted on dual rail adapters, and that was the thing that complicated the build, because I had to make some scratchbuilding. I began searching information on the dual rail adapter, fortunately ARC has a comprehensive walkaround on the subject, with many photographs and information on its measurements. Here's the link to it: http://www.arcair.com/awa01/101-200/awa152-A-10-Andreychik/00.shtmThe dual rail adapter consist of a pair LAU-105 missile rails mounted at the sides of a LAU-114 center section. Fortunately, I could buy before 2014 (the first year from which in Venezuela nobody can buy anything from the Internet) the Hasegawa Weapons set III, which included different kinds of Sidewinder missiles and two pairs of its launchers, two for the USAF and two for the US Navy. The pair of LAU-105 was cut from an USAF Sidewinder dual launcher, so I only needed to scratchbuild the LAU-114 block. Nevertheless, I didn't decide to undertake this task until the end of 2019. To scratchbuild the LAU-114 block I first computed its approximate dimensions, in 1-72 scale and in milimeters, from the ones published in ARC, then I took two pieces of rectangular identification plates taken from spues of an already finished Hasegawa kit, cut them to the size I computed, glued them one atop the other, adjusted the height with a file, draw the small rectangle of the top of the piece where it hangs from the underwing pylon, and proceed to give the piece the trapezoidal shapes it has with careful filing (by the way, I only use nail polishing files with my models.) I also gave a round shape to the front edge of the piece. When I was satisfied with the LAU-114 shape, I glued the two LAU-105 rails to the sides of the LAU-114 to complete the dual rail adapter, painted it and glued it under its corresponding pylon.
The Sidewinders were obviously taken from the aforementioned weapons set, and were painted following the instructions and photographs of the full-size subject as used by the A-10. The weapons set also supplied decals for the missiles, but there is only one decal of each kind for all the group of Sidewinders missiles, so the modeler has to cut the stripes he needs for each missile. As is frequent with Hasegawa kits' decals, a lot of decal solvent is needed to hold the decal to the surface, in this case the cylindrical body of the missile. Once the missiles were finished, they were glued to each rail. I made some touch ups to finish my kit. As the kit's decals are very old, the red of the decals on the model has turned to a pinky red, so I overpainted the red portion of the shark mouth with a brush. I also had to overpaint some of the teeth in places where the decals were cracked. In this way my Warthog was finished and I am very satisfied with the outcome, specially taking into account that I'll never build another A-10 because I have many other kits waiting to be built. Thanks for watching and reading. Orlando Sucre Rosales
|
|||||||||||||||||||||||||||||||||||||||||||||||
Photos and text © by Orlando Sucre Rosales