|
|||||||||||||||||||||
|
|
|
|||||||||||||||||||||
|
|
|
|
|||||||||||||||||||||||||||||||||||||||||||||||||||||||
|
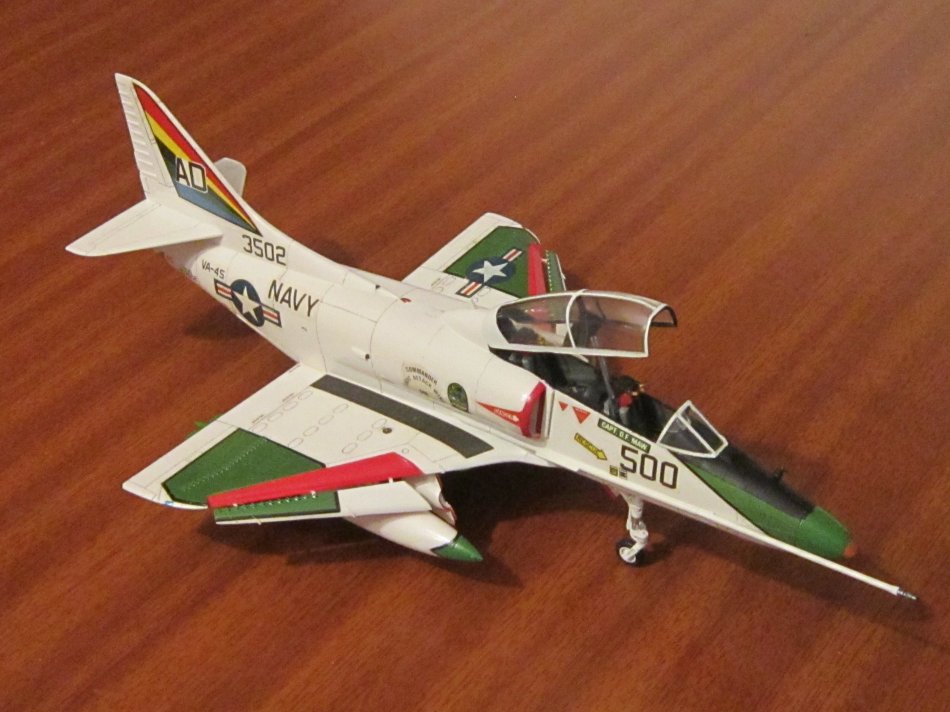
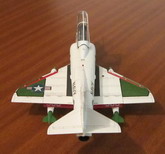
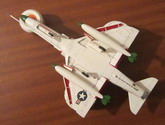
Hello, fellow modelers and readers! This time I'll share with you my recently finished Douglas TA-4J Skyhawk from Fujimi, in 1/72 scale. The Fujimi TA-4J/F kit is a very well detailed one with fine engraved panel lines. It has four decal options: two different TA-4J trainers from the US Navy, one TA-4F from the US Marines and a TA-4H from Israel. The Israeli version in fact cannot be built without scratchbuilding or buying aftermarket parts, because the kit doesnt supply parts for its enlarged tail section. I selected to build a TA-4J trainer because of its colorful marking options. My first choice was the VC-1 sqn. "Blue Alii" option, but I noticed that one of the rainbow-like decals that go over the fin was noticeably out of register. I also feared that the decals wouldnt sit well over irregular surfaces such as that of the rudders ribs. Therefore my final choice was to build the VA-45 sqn. "Blackbirds" option. The kit has several building options, such as open or closed canopy, and open or closed air brakes. Through my research of the subject I found that the airbrakes were never opened when the aircraft was parked, so I chose to build my kit with the airbrakes closed, and with the canopy opened. Although the kit instructions indicate to add Zuny rocket launchers to the outer underwing pylons, I found that the TA-4J trainers didnt even had the outer underwing pylons, so I sealed their attachment holes with CA glue. Regarding the center line drop tank, although I didnt found photographs of TA-4J trainers carrying it, at first instance I decided to use it.
I began to build this kit many years ago, and the build process went without big problems. The fit was very good, so very little filler was used. By the time I was building this kit I was using grey putty. I didnt imagine then that the color of the putty would represent a problem at the finishing stage. My Skyhawk remained unfinished for years for several reasons. In first place, it should be finished in gloss white. I know that enamel gloss white doesnt remain white over the years. Although Ive experienced with enamel flat white with a gloss coat on a pair of models, on one hand I hadnt enough flat white paint to cover the whole airframe, and on the other I wanted to experiment with acrylic white paint. As Ive mentioned here before, its extremely difficult to get models and modeling supplies in my country Venezuela, so I had to wait until the end of the 2019 year, when a fellow modeler and friend could bring to me some modeling supplies, including gloss white acrylic paint, from the USA. I started painting the model in 2020. The Model Master Acryl Gloss White paint didnt behave as well as I expected. I found that it has a very poor coverage when I applied the first coat. Therefore, I decided to paint the areas where the grey putty was visible with a coat of pale grey before painting more coats of white. Three full coats of white and some touch ups were needed to get a uniform finish. As a result, some of the panel lines almost disappeared, so I had to rescribe some of them. The gloss finish wasnt as gloss as I expected, but I thought that it was good enough for decal application. Now it was time to paint the red that goes on the edges of the undercarriage doors and the air intakes, inside the underwing flaps and inside the slats. It was very difficult to mask around these areas, specially around the slats and top wings. It was painted with flat Insignia Red, and later a gloss varnish overcoat was applied. One of the most difficult to mask and paint things of this model were the front and rear tips of the underwing drop tanks. The masking was difficult because the surfaces are curved but the lines should appear straight when viewed from the side. In the case of the front tip there should be two straight lines symmetrical with respect to the center of the drop tank. In the case of the rear tips, there is only one straight line, but separate masks should be designed for the bottom and the top because the rear winglets are in the middle. In both cases, the green areas should be symmetrical when viewed from the top or from the bottom. I made my masks with Scotch Magic tape and the aid of a French curves template to achieve symmetry. Although the kits instructions indicate Gunze Sangyo H80 for the green, I compared it with that of the decal sheet and realized that it wasnt a good match. I mixed a close match using Humbrol enamel greens Hu80, Hu3 and Hu38, and tested it on the decal sheet. When the masks were cut and applied, I airbrushed my green mixture, and when it was dry I carefully brush painted the black outlines and put the drop tanks apart. It was time for decal application, and additional problems arose. As I feared at the beginning, the decals didnt conformed well over curved or irregular surfaces, even after applying several coats of a strong decal solvent (Solvaset.) In the case of the two decals that cover the top of the nose and part of the bottom, the decals wrinkled and cracked near the tip. In the case of the green triangles that go near the top of the outer wing extremes, and their prolongation over the slats, they didnt conform over the vortex generators. I decided to remove the problematic areas carefully with a knife and paint these areas later. In the case of the USAF insignia that goes over the port wing, I couldnt made the decal conform over the vortex generators, but I didnt tried to fix it.
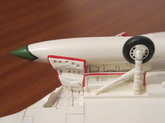
I made the same green mixture that I used to paint the tips of the underwing drop tanks, and brush painted the areas where the green decals were removed. I regrettably found that painted green didnt match the one of the surrounding decals. I reached to the conclusion that matching a color on the decal sheet doesnt guarantee that the color is a good match after the decal is applied to the model, especially if the model is painted white. I had to test several new mixes until I could find a good match again. Nevertheless, I wasnt fully satisfied, so I brush painted again the green of the tips of the underwing drop tanks, and also painted the triangles on the top wing surface. Another part that required carefully painting was the arresting hook. The thin and straight part of it measures 25 mm and has 15 interwoven white and black strips. To make 15 equal segments, I draw a triangle with a 30 mm hypotenuse and a 25 mm side, divided the 30 mm in 15 equal 2 mm segments, and transferred these marks to the 25 mm segment using lines that are parallel to the third side of the triangle. In this way I could made a 25 mm Magic Tape template with 15 equal-width segments. The template was placed over the arresting hook and the segments were marked. Then the black strips were carefully brush painted. I never imagined before that I would use geometry in this way! In the case of the black anti-glare panel, I decided to airbrush it, instead of using the kit decals, for four reasons. The first, and more important one, is that I found after the decals were dry that the top separation between the two green nose decals that surround this panel was bigger than the width of the anti-glare panel decal. The second reason is that the black of the decal looks like a brownish dark grey, as it can be seen on the wing walk "black" decals applied to the model. The third reason, a very important one, is that the pitot tube and its base (both were scratchbuilt, by the way) lie inside the anti-glare panel area, and I was sure that the decal wouldnt cover it. The fourth reason is that, even if the three previous reasons didnt exist, the panel would need a carefully applied overcoat of flat varnish anyway, to represent an anti-glare panel (in fact, I later applied a flat varnish coat over the wing walk decals with a brush.) During my research of the TA-4J at the Internet, finding a photograph of the real VA-45 airframe (#3502) was very difficult, and I could find it only when the decals were already applied to the model. I carefully observed it and noticed several details. The more important is that the tip of the nose wasnt black as the kits instructions indicate, it had a light red-brown that I could reproduce very well with a mix of Hu100 and Hu63 enamels. The second detail is that the tip of the refueling probe isnt black, it has a dark steel color and I could paint it this way. The third detail is that the front undercarriage door doesnt carry the lettering that was applied as a decal. I tried to remove the decal following the directions found in my bottle of Microscales Micro Set, but it didnt work. I initially decided to keep the decal. At the beginning of 2021 I changed my mind and removed the decal by sanding it. I knew that I had to paint the front undercarriage door again, so I decided to remove also the pylon that would hold the center line drop tank. In this case, I had to fill the holes were it was glued and sand the surrounding area. Then I airbrushed the undercarriage door together with the place where the center line pylon was. Other details I found looking at the photograph of the real airplane are that the green of the kit decals is different than that of the real airplane, that the black trim of the real airplane is thinner, and that the inner edge of the intakes had a red strip that isnt supplied as a decal. I decided not to invest more time and paint in fixing these little differences, except in the case of the red strip, that was made by cutting it from a decal of an unbuilt kit that Im sure I will not use. Once I was satisfied with the painting, it was time to deal with the panel lines. I mixed an enamel wash and applied it carefully with a very thin brush over almost all the panel lines, carefully cleaning any excess with a moistened cotton bud or with another brush. I left off some panel lines that almost disappeared under the paint or under the decals. It was a fastidious task that took a couple of days. Then I glued the drop tanks and the rear canopy to their places and the model was finished. Well, after all the struggle with this model, Im very pleased with the final outcome and with all that I learned. I dedicate this colorful model to my lovely wife Omaira in the month of her birthday. She helps to
Colour my World (the title of a very famous old song from the Thanks for watching and for your patient reading. Orlando Sucre Rosales
|
||||||||||||||||||||||||||||||||||||||||||||||||||||||||
Photos and text © by Orlando Sucre Rosales