|
The venerable and
rather old Monogram F-105G kit in 1/48th scale is well known by most if not all
of us. Typical of its 1980's offerings Monogram provides a good and
rather easy to build representation of the THUD. I found the "G" model
at a hobby show and wanted it as I knew it would provide a
powerful and eye catching plane for my collection.
The F-105G Wild
Weasel was Republic's replacement to the original North American F-100
version of the first Wild Weasels. The big Thunderchief served ably in
this roll for many years and saved countless lives of airmen
in the Vietnam war. Later to be replaced by the F-4G Phantom the F-105G
was a great platform for the Wild Weasel concept.
The kit itself is
rather straight forward to build. Typical of Monogram its simplicity
was balanced out with good detailing for the 1980's model
technology. Raised panel lines abound but IMO are not too out of scale. I
have tried rescribing kits in the past but such can be
frustrating unless you are keen and patient enough to do it often. I
stuck to the raised lines as per the kit. In fact its basically an
out of the box build. I prefer this as it allows for my
own cheapie tweaks and it keeps costs down. Factoring the detail
including the cockpit is pretty good, well I was fine with it. Many others
may get all anal over such detailing endeavours etc. and that is
fine but for me messing around with basic OOB builds is cool too. I just
like building nice representations of real planes. I experiment and
tweak with home made ideas and concepts borrowed from other
modellers but I try to keep my building fun and stress free.
The kit builds
pretty well and I'm sure many of you would concur. Fit and finish is good
with little filling and sanding needed.
|
Click on
images below to see larger images
|
 |
|
Things one needs to be concerned
with are the struts on the landing gear. The long plastic
representations can be broken easily if you are not careful. I
tend to keep all these twitchy and small details till very
last in building.
Onto the things I did and
liked with my build of this THUD.
Painting was S.E. Asian
motif with a Badger 150 airbrush. I generally prepare my painting with
building in proper order the various cammo colours. Once each are
laid on the kit I add a drop or two of black and post shade by hand with
my Badger 150 to give detail effects and a more impressive 3D image. I
do this with each colour after they are painted. However on this
plane I new it was to be a war bird and I was pretty sure that in war
wear and weathering would have its toll on the 105G. So I before any
cammo went down I sprayed the plane with KRYLON SILVER paint. This
is a very fine pigment paint available in bottles. It lays down and look
like bright aluminium. Once dried for at least 24 hours I
sealed it with two thin coats of FUTURE polish. When that was dry I painted
the cammo as noted above. With thin rubber gloves on and the paint about
95% dry I began taking pieces of masking tape and began rubbing them
on places that would show chipping. I quickly peeled the
tape off and it gave very realistic paint chipping effects. It's
IMO better than trying to paint on silver after the
main paint has been laid down.
Letting the whole shebang
sit for about two days I then put on 2 coats of FUTURE,
applied the kit decals ( Monogram can be stingy on these decals )
The use of Micro Sol and Micro Set laid the decals down well. 24
hrs later I put on another coat of FUTURE. Then when dried I
flowed a thin dirty brown-black paint into all flap
lines and areas were grime might flow. With aluminium coloured landing
gear and gear bays if you flow a dirty black-grey paint then
let it dry, it will give a very aged look to the aluminium. I then once
all dry wiped off the excess.
Testors Dullcoat was sprayed on to
flatten out the paint and then I took out a sharpened charcoal
pencil ( check art supply stores ) using the edge near the tip I traced
the raised panel lines as best I could. Careful not to smudge with your
fingers ( wear thin rubber or plastic food handling gloves )
I then took a soft 1 inch wide brush and brushed with
a certain stiffness in pressure the panel lines. This
removes a lot of the charcoal dust and smears it a touch. It leaves
enough of the charcoal dust on the lines to give good
effect. This technique also scales down to the eye the raised
panel lines.
Though it does not look as good as
engraved panel lines, it looks pretty decent and adds realism to
the kit.
I did add a bit of paint mis-matching
of add on items to give effect as to wartime pressures on field
maintenance etc.
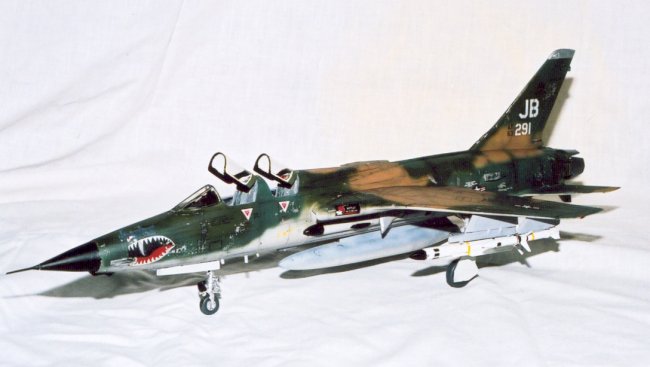
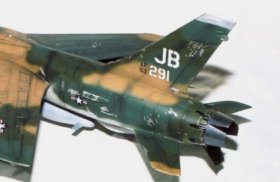
The photos you see show off much
of what I have written here. I hope m few ideas add to the knowledge
others may want to try out on similar type kits. Warbirds should
look messy and tired IMO and this Wild Weasel looks
so. The big F-105G sits with my other hot jets very nicely. The
S.E. Asian cammo is cool and different. The paint chipping stands out
and this brute looks ready to rumble.
I wish to dedicate this
story and images of my built kit to all Wild Weasel drivers as you
were " first in and last out."
Les
|