|
Hi
everyone,
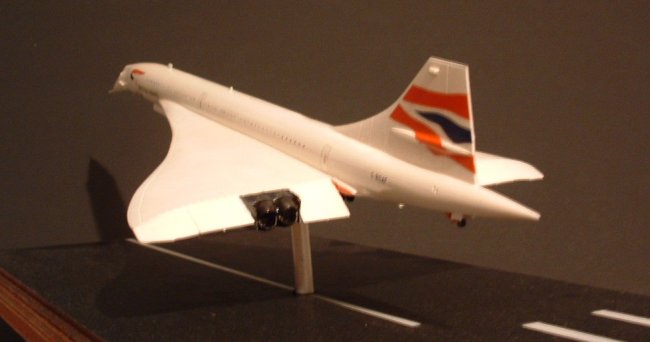
This is my 1/144 scale Concorde in British Airways markings. This project
started quite some time ago, when all the UK news channels were showing pictures
of Concorde's last flight into Heathrow airport in London, my good friend David
shot me an email asking if I could build him a model of the beautiful aircraft.
So saddened was he that "Our Concorde" would not be roaring over the
British skies again, he wanted something more than a photograph to remember it
by. So a week later, we chatted over a cup of tea and sorted out how David
wanted his model to look and what kit should be used.
At that time, not many kits were available to choose from as the big 1/72 Airfix
kit had not been released yet. This left us with a choice between the 1/144
scale offerings from Revell and Airfix. After asking around, the general opinion
was that the Revell kit was the better of the two.
|
Click on
images below to see larger images
|
|

|

|
I bought the
Revell kit in November 2003 and started work on it in January 2004. Building the
kit, at first glimpse seemed to be a simple enough task, until I realised just
how much filling and sanding this kit would need. When I put the fuselage
together, the seam was very prominent and needed a lot smoothing out. The worst
bits were yet to come, the wing roots just do not fit at all-lots of filler and
sanding here, the same goes for the engine nacelles too. Eventually some weeks
later, I started to make progress and primed the entire airframe.
Next I started on the nose and landing gear.
David had asked me to pose the aircraft on a base as if it was coming in to land
on the runway, so the nose and supersonic windshield would have to be posed in
the extended position-no problem here, Revell gives you this option on their
kit. However, all they give you for the inner windshield is a flat, rectangular
transparency. Yep, more work! It isn't so difficult to rectify this problem
actually. All I did was cut the kit part in half and build a frame around it to
resemble two separate windows. Any gaps were soon solved by adding a little PVA
glue around the edges.
The next step, was to put the nose and supersonic windshield onto the model. The
nose went together fine, unfortunately, I did a terrible job on the windshield,
whilst I masked up the clear parts as best as I could, I still ended up with
paint all over the glass. Now this piece of plastic is smaller than the nail on
your little finger, if your not too good with clear parts (Like Me!) then you'll
have problems. After much swearing and pacing up and down my workshop, I decided
that I would sand everything off and start again. To be honest, my skills are
not that great and I could not make the windshield look any better-in fact I
ended up sanding all the frames clean off! In the end I had to send off to
Revell for a new one.............................
............Three
months later, the new windshield arrived in the post. By then, I had been given
some thin adhesive white strips that were perfect for the windshield, no paint
needed-Phew!
Now all I had to do, was modify the landing gear to look as if "hanging in
flight" and reposition the flaps for landing configuration. This was done
very quickly, they were cut off and glued on again and the actuators underneath
were cut and repositioned. After 4 coats of Humbrol semi-gloss white, I was
making progress! Next the engines were masked off and painted in metallic
black. All I needed to do now was gloss this thing and add decals. Guess what?
Revell didn't supply the livery that my friend David had wanted! So I asked
around some of my kit-bashing buddies and my friend Greg came through for me
with decals from the rival Airfix kit.
Once all the decals were settled down, another coat of gloss was sprayed over
the entire model. Next, I drilled a hole into the underside of the airframe and
added a small aluminium tube, that would support the model when attached to it's
display base. The base was a piece of MDF cut to the dimensions of the top of
David's wide-screen TV (Well......that's where he wanted to display this
model......) It was given a runway paint job and varnished and the model was
mounted into the base with super-glue. At last, it was finished after 14 months
of trial and tribulation!!
I presented the model to my friend a week before Christmas 2004, He smiled and
said it was worth the wait. Now it sits proudly on top of his TV so he can
always see Concorde fly everyday. I hope you like it too,
Darren
|
Click on
images below to see larger images
|
|

|

|
|
|