|
Until now all of my contributions to ARC have been of aircraft, but I've been
known to delve off into the spacecraft end of modeling also and I thought
this project deserved to be mentioned to the ARC readers who like this kind of
subject. I also thought it deserved mention because this is one fantastic kit of
a seldom seen spacecraft subject. The kit is available from Apogee Components in
Colorado Springs, CO. It is in every way a functioning and flying model rocket
but also everything is there to make it the finest example of a static
display Saturn 1B with the Apollo capsule payload I've ever seen in kit form
that's on the market. Everything about building and painting the rocket is
included in 2 CD's. These 2 CD's were very carefully thought through and planned
out for the construction and finishing of the model and are in fact necessary to
make the project work.
This is
not a kit you will be able to slam together in a few days, not if you want it to
come out looking right anyway. The kit retails for $185.00, quite a lot of money I
thought for such a kit, but when I visited Apogee and saw what the
finished model looked like I decided to go ahead and make the purchase. I
believe it was well worth it.
Most of the model is constructed of light-weight mylar tubing with vacu-formed
and some injected molded plastic. Various forms of adhesives were used in the
construction so if you're used to only Tenax-7 you'll get a quick adhesive
lesson building this kit. Most of all, quite honestly, it was a fun build
because of the challenge of not just putting plastic pieces together.
The kit basically breaks down into four sections, the fin section, the
booster/cluster section, the S-IVB section, and the LEM transition/CM Apollo
capsule section. The CD's give detailed instruction of the building of all the
sections of the rocket, as well as the construction of the parts to make it a
model to display also. I recommend making this a model you can fly, it's just to
impressive not to see some smoke billow from the bottom of this thing. Not to
mention the thrill of seeing this big rocket lift off a launch pad! If you
intend to launch this rocket I suggest not gluing the escape tower to the Apollo
capsule, just seems safer to be able to remove it if you're going to put a motor
in the bottom of the rocket.
For the
most part I followed the instructions from the CD's, the only thing I really did
differently was how I approached the painting of the rocket. Everything needed
to properly paint the rocket is contained on the CD's and can be printed from
the CD's which I did. You will need these prints to keep everything aligned when
you start adding the black areas on the rocket. And while the author makes
use of regular spray cans to paint his model, I used my trusty airbrush.(
I'm old and set in my ways) Priming is a must so don't think you will be
able to negate this step. Mylar and paper will soak up a lot of paint! When you
get ready to paint the fin assembly I suggest using decal paper on the actual
fins. The reason for this is I had trouble with the paint adhering to the resin
fins even though I had prepped them before paint. I cut out some
large portion of clear decal paper, painted them flat back and flat white and
let them dry The reason for this is it was a lot easier to cut out the
black or white portion of the fin and set it with Solva-Set, it also made a
nice sharp line to define the black and the white.
|
Click on
images below to see larger images
|
|

|
|

|
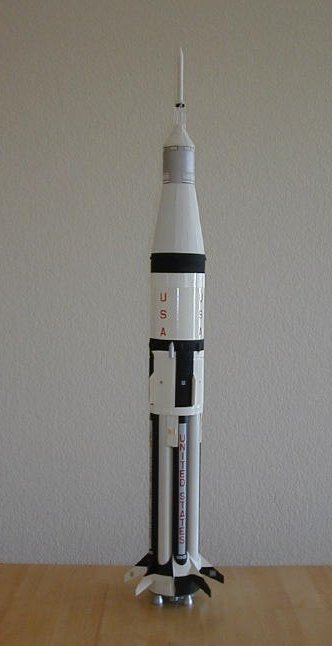
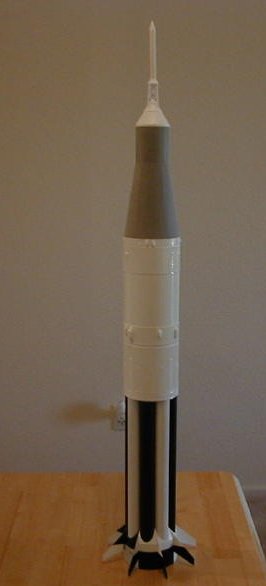
The pictures along with this text show the rocket in various stages of painting.
To get the nice defined lines with the black areas on the corrugated parts I
used regular 3/4 in. masking tape and pushed the tape into the corrugations with
a finger nail. I only painted a small area at a time to make sure the tape was
staying down in the corrugations.
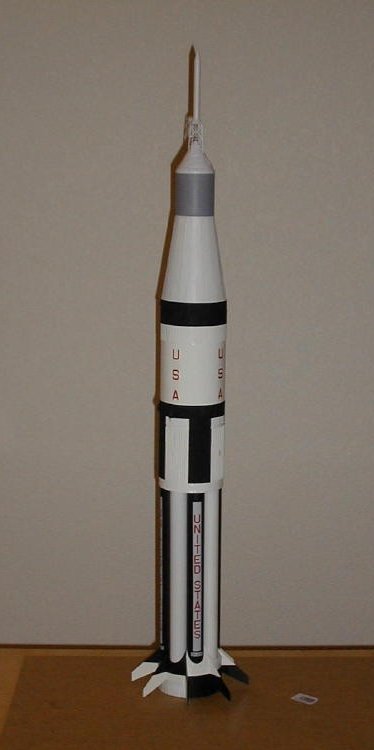
With only the CSM and Apollo capsule left to paint it was time to decide how to
decal the rocket. The kit decal sheet offers all the Saturn/Apollo launches that
used the Saturn 1B as the booster. I decided to decal the rocket in the
numbers of Apollo1 (this mission was actually designated SA-204) to
commemorate the astronauts who died in NASA's first tragedy. On January 27, 1967 a
fire on the launch pad claimed the lives of astronauts Virgil I "Gus"
Grissom , Ed White, and Roger Chaffee when an oxygen fed fire swept through
their Apollo capsule while doing pre-flight checks for a mission rehearsal.
After this all manned space-flight was canceled until a complete re-design of
the Apollo command module was finished.
For all the ARC readers who are interested in spacecraft I highly recommend this
model. You can view this kit and all the other rockets available from
Apogee Components at www.apogeerockets.com.
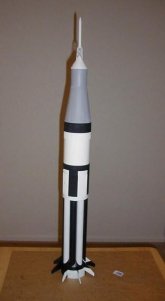
I have installed pictures with this text to show the different sections of the
model as well as the rocket fully assembled. It stands over 3 ft tall when
fully assembled and it will make quite a conversation piece.
Steve
|