|
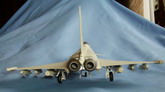
After Revell`s
two-seater Typhoon T.1 was given such a good reception, the single
seat active duty Eurofighter was much anticipated, and Revell`s
offering has not disappointed. An incredibly rich decal sheet (many of the
smallest decals that you may lose in the carpet have back-ups, just
incase) and a large array of stores compliments the excellent detail
of the kit itself. However, there are some minor details that have to be
addressed, especially when making an RAF machine. Nothing major is
required but a few small details go a long way with this kit.
RAF
Typhoons, of No. 3 Sqn and No. 11 squadron recently took up Quick Reaction
Alert (QRA) duties and this was the fit I chose for my Typhoon, which also
happens to be based on the first all-new Block 5 machine fitted with
the PIRATE device for target identification, delivered to 11 squadron in
August of this year (2007).
The following
is a brief rundown of the points which need attention when building an RAF
machine, although some points apply to Typhoons of any nation.
-
1- The seat
require straps, pan handle, tab removed from head-box, rear of head-box
closed up with plasticard, tubes from head assembly that halt in mid-air
must be linked to mid-way down chair with fusewire whiles ensuring the
seat still fits into cockpit tub, plasticard seat cushion added.
-
2- Plasticard
throttle replaces kit one, fusewire struts added to either side of HUD.
Plasticard rear-view mirrors added to canopy. The canopy fit is not great
and dry runs should be conducted.
-
3- Air intake
tunnels must be added before fuselage assembly and topped of with
plasticard. I used a pair of cut-down fuel tanks from a Tornado.
-
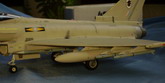
4- Two
vanes added to cabin air exhaust (the gaping hole below the cockpit,
portside), APU exhaust scribed into apperture atop port wing.
-
5- Hydraulic
lines added to main gear, forward gear strengthened.
-
6- Addition of
rear facing MAWS probe at base of fin which sits at a slight angle off the
vertical.
-
7- Small
sensors appear port/starboard of the nose and must be added. Additional
sensors appear P/S just ahhead of the main flaps and can be picked out
with gunmetal paint.
-
8- A small
aerial appears just ahead of the canopy and is slightly offset to
starboard.
-
9- Small
opening opened up at the rear on outermost ASRAAM launch rails.
-
10- For QRA
fit The Typhoon carries 4 X ASRAAM. I used the pylons from spare fuel
tanks and cut them down to fit. ASRAAM from a second Typhoon were added to
the two that come with the kit although these missiles are not difficult
to scratchbuild from rod if need be.
-
11- AIM-120
AMRAAM are kit types, but require the addition of fairings down one
side. The front two face out the way, whiles the rear two missiles
have the fairings facing inwards.
-
12- Navigation
light moved from starboard to port of forward gear well.
-
13- Two `X`
shapes should be scribed into the rear of the starboard wingtip pod to
denote the towed decoys that are housed there. These can be highlighted
with black wash.
-
14- Add
Clear-Fix (or equivelent) to PIRATE and
navigation lights to give glossy `glass` veneer.
-
15- I cut up
the decals to get the numbers and letters that I needed for the Block 5
machine, the worst bit of which was getting the tiny letters for the
Pilot`s name and individually sticking them on. It worked out alright
though and all that was left was weathering and varnishing, remembering to
stain the distinctive APU exhaust on the port side last thing.
One assumes the
Revell will use this kit as the basis for future projects as The Typhoon
programme evolves. I think they have got off to a great start and look forward
to what they come up with next. With a little work, a good representation
of The Typhoon can be gained without a lot of aftermarket assistance. However,
that said, the kit could do with more ASRAAM, targeting pods, and laser
guided bombs which I hope garage industries will soon supply us with.
Cheers all,
Ian
Click on
images below to see larger images
|
|